From Simple to Maintainable: Upgrading Our Streaming Data Platform
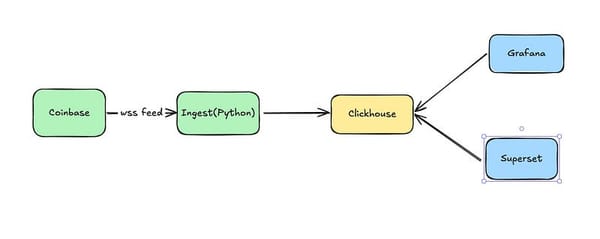
In a previous post I talked about how to build a simple streaming data platform using ClickHouse. We reached a point where the platform…

In a previous post I talked about how to build a simple streaming data platform using ClickHouse. We reached a point where the platform delivers real business value, which should always be our priority as data engineers.
That’s a great first step, but it’s where too many platforms end. If we stop here, all will seem fine at first — then we’ll start to notice that we spend more and more time reactively handling problems. Our business partners will start reporting data issues and new team members will have difficulty finding what they need to change and will start accidentally breaking existing datasets because they have no way to understand the downstream impacts of their changes.
I’ve been there before and would prefer not to go back, so let’s extend the platform before it starts to hurt.
We’ll start by adding tooling that allows us to practice software engineering discipline in our handling of data models. This will allow us to:
· Avoid duplication in our transforms — DRY (Don’t Repeat Yourself)
· Ensure we have a single source of truth for our data
· Standardize our versioning and style
· Implement testing
· Document dependencies
Last week I showed how to add support for ClickHouse materialized views to DBT in order to support the use of DBT in this project. Now I’ll take the seed we sowed in that article and use it to improve the maintainability of our platform from an engineering perspective. To begin, we’re going to make use of DBT, or at least, a subset of DBT’s functionality.
DBT Installation and Setup
DBT provides both a cloud hosted solution and dbt-core, which is the open-core portion of DBT. Continuing with the theme of simple solutions we can host ourselves, I’ll go with just running dbt-core locally. As with the previous post I’ve made the codebase where I implemented this available on GitHub — feel free to either follow along or grab the code and try it out yourself.
Since I’m using Poetry for this project I’ll start out by installing DBT using Poetry:
poetry add dbt-core==~1.8.0Notice that I’m specifying version 1.8 — anything older than this and we won’t have unit testing available to us, any newer and as of late February 2025 the ClickHouse plugin won’t work. It looks like ClickHouse will be caught up pretty soon and you may be able to use the latest version by the time you read this.
Now let’s grab the compatible dbt-clickhouse plugin:
poetry add dbt-clickhouse==^1.8.9Finally we’ll create a dbt project:
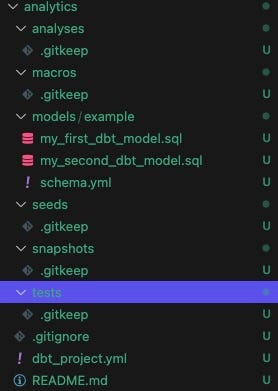
dbt initAt this point it will ask you what to name your project (I chose analytics) and what database to use (clickhouse) and it will create the project structure for you:
Structure
One lesson from software development is that standards matter when it comes to structuring your projects. They allow people to onboard to new projects quickly, reduce mistakes and duplication by creating an obvious place to look for functionality, and make it easier to automate.
DBT provides a guide for structuring projects, which is absolutely worth a read. I recommend following it until you’ve had enough experience with DBT to understand where you’d be better off breaking with their suggestions. Once you do deviate from their suggestions, create a new standard for yourself, write it down, and implement the change across your organization if possible. Otherwise, if you change standards on a project-by-project basis you’ll end up with effectively no standard.
In this project we don’t need the full project structure, so I’ll just dive into the parts we do need and why they’re structured as they are.
Models
Models are one of the core concepts of DBT. They are where we record the transformation logic that DBT is intended to manage. You can think of these as the heart of the product and everything else as utilities for making the management of these models more efficient. When you first create the project, DBT will add a couple of example models for you. I’ve deleted those and created the models we’ll need in order to manage the Coinbase streaming trades demo:
Within models, we have four directories, which we’ll explore further below:
- Staging
- Intermediate
- Marts
- Utilities
Staging
The staging directory is intended to provide building blocks for the rest of the models we’ll build in our project. Models in the staging directory should be either unchanged or minimally changed from how the data is received. Changes such as renaming are fine, but potentially lossy changes such as altering the grain of the data are not.
The staging directory is the only place our models will directly reference sources. Sources represent the raw data coming in from operational systems and third parties.
In our example, I’ve subdivided the staging directory by source rather than grouping by the ingestion technology or by business grouping. My grouping is based on the DBT recommendations. The reasons to do it this way are that search by source system tends to be easy, and the data in a source system tends to be similar. I choose not to do it by ingestion system for two reasons — there may be a LOT of data sources coming in from a single ingestion method. For example, a company may do all ingestion from third parties via Airbyte. Also, if you have several ingestion sources it may also not be easy to find which tool was used for a particular dataset.
Inside of our structure we have two kinds of file — configs, defined in YAML, and model implementations.
I’ve defined our data sources in the _coinbase__models.yml:
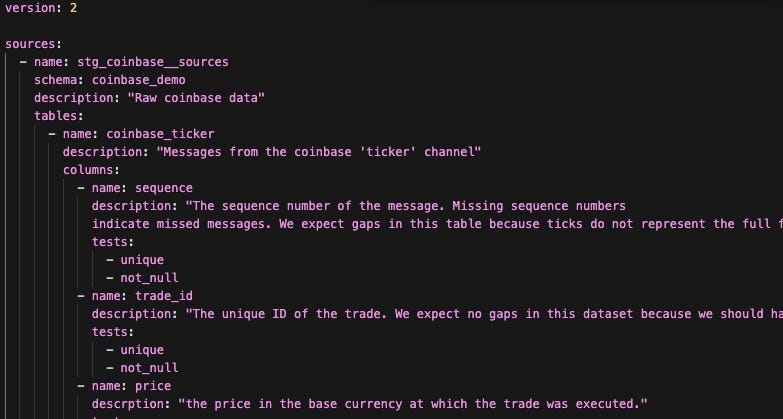
Breaking down the contents of this file a bit:
- Sources — The list of individual data sources we have in our project. A source has a name, a description, exists in a schema, and consists of a set of tables.
- Tables — Exactly what it sounds like. A table has a name, a description, and consists of a set of columns.
- Columns-Again, exactly what it sounds like. A column has a name and a description.
I’ve also added the built-in unique and not-null tests to columns in this table. We’ll cover tests later, but it is worth mentioning that we get a significant advantage for adding generic tests here — not only can we execute the tests against our models, but the tests appear in our DBT docs, along with everything else we’ve written here, giving us living documentation of our models. The tests can also be executed by DBT, avoiding a pernicious problem in software — deceptive documentation that was written and never updated when the assumptions changed. In this case, if the model says ‘not null’ I can be confident that is correct — as long as we actually run the tests. You can add tests to most entities within DBT, just as I’ve done for the columns here.
Moving on from the YAML files describing the models, we find the models themselves. Each model is placed in a file by itself, in our case a SQL file. Our staging model, stg_coinbase__trades.sql looks like this:
{{ config(
    materialized='table',
    engine='MergeTree()',
    order_by='trade_time'
) }}

with source as (
    select * from {{ source('stg_coinbase__sources', 'coinbase_ticker') }}
)
select
    sequence as sequence_id,
    trade_id,
    price,
    last_size,
    time as trade_time,
    product_id,
    side,
    open_24h,
    volume_24h,
    low_24h,
    high_24h,
    volume_30d,
    best_bid,
    best_ask,
    best_bid_size,
    best_ask_size
from source
There are two relevant pieces here. At the top of the model is the ‘config’ section, which tells DBT how to materialize the model we’ve created. Take a look at my post on DBT Custom Materializations for details about this piece. The other relevant portion describes the transformation we apply in order to generate the model. The CTE that begins the transformation uses a macro
{{ source('stg_coinbase__sources', 'coinbase_ticker') }}to indicate that we are pulling the data from a source table — coinbase ticker — and we then apply a couple of renamings to bring the Coinbase model inline with the model we expect for trades. This level of simple transformation is what we should expect in a staging model. All we do here is basic cleanup to ‘stage’ the model for use in more advanced transformations. By using the source macro we also surface the dependency to DBT, which ensures that DBT builds the DAG correctly and uses it both in model construction and documentation. I’ve used the ref macro similarly in int_trades_per_minute.sql.
{{ ref('stg_coinbase__trades') }}In a batch-oriented platform, in staging, the model would be defined either as a view or a materialized view which is updated on a schedule. We would be executing dbt run and dbt test on a subset of our models, either on a schedule or upon receipt of an event telling us new data has arrived. Execution would be handled via an orchestration tool such as Airflow or Prefect, and DBT would handle making sure that dependencies were respected in the order that models are executed.
That being said — that doesn’t work for ClickHouse materialized views. Remember that we can’t base a ClickHouse Materialized View off of a view and we’re using ClickHouse Materialized Views as a way to get a tabular data with highly efficient updates and queries. In our project the ClickHouse Materialized View defined in stg_coinbase_trades_mv.sql updates the table we define in stg_coinbase_trades.sql. The materialized view gets its data from the source table coinbase_demo.coinbase_ticker, which is updated by our streaming ingestion tool. The table stg_coinbase__trades is in turn is used as the source for downstream models such as int_trades_per_minute.sql. Because ClickHouse manages the flow of data between tables there is no need for us to rerun our DBT DAG unless the model changes. That means that we don’t need the schedules or events, nor the orchestrator, though it is all still available to us for use when we add some batch data to this platform. Since we’ve used DBT, when we do have batch data it will all work together seamlessly.
This does leave a bit of a gap though. There is no natural place to run our data tests.
Before we go any further, let’s pause and talk about testing in DBT. DBT defines three kinds of tests:
- Singular Tests
- Generic Tests
- Unit Tests
Singular tests run a specific SQL against our source data, where the query is written to return any rows that fail the test. I’ve written a singular test for the vwap logic:
-- This test directly builds sums values from the trades table and compares them to the vwap_5_minute_mv table
WITH trades as ( -- Get all trades
    SELECT * from {{ ref('stg_coinbase__trades') }}
),
vwap as ( -- Get all vwap values
    SELECT * from {{ ref('vwap_5_minute_mv') }}
),
totals as ( -- Get all sums of trades
    SELECT
        tumbleStart(trade_time, toIntervalMinute(5)) as minute,
        SUM(last_size) as total_volume,
        SUM(1) as num_trades
    FROM trades
    GROUP BY minute
)
-- Compare the sums of trades to the vwap values
SELECT *
FROM vwap
LEFT JOIN totals
    ON vwap.minute = totals.minute
WHERE totals.num_trades != vwap.num_trades
  -- We're doing floating point arithmetic and can't expect exact matches.
  OR abs(totals.total_volume - vwap.total_volume) >= .0001
I ran this test after creating the models, which confirmed that the initial load of the model was running correctly, but it didn’t do anything to ensure that our model was being updated correctly in real-time. Here we have a couple of options — one is to run DBT test on a schedule to check that our values are being updated correctly. A better option for a real-time system is to add a check in Grafana which will give us an error condition when one of the most recent rows fails.
The next type of test, generic tests, suffers from the same problem. We have defined them on our models and are running them on model creation. Again though, we need to run them regularly to ensure that new data passes the tests since all data is not being added through DBT.
Finally, we have unit tests. Unit tests solve a key problem in DBT. Notice with both singular and generic tests we run DBT, create our models, and then run our tests. We’ve therefore already created the datasets before checking that the data is good. There are tools and approaches we can use to help with that problem — data versioning for example — but we’d still like to be able to check our transformations before they impact real data.
I’ve written a unit test inside the _intermediate__models.yml as an example:
unit_tests:
  - name: test_trades_from_same_minute_grouped
    description: "ensure that if I have only trades from a single minute they are correctly grouped"
    model: int_trades_per_minute_mv
    given:
      - input: ref('stg_coinbase__trades')
        rows:
          - {"sequence_id": 99489631026, "trade_id": 782910562, "price": 97819.82, "last_size": 0.0000002, "trade_time": "2025-02-21 15:46:04", "product_id": "BTC-USD", "side": "buy", "open_24h": 96926, "volume_24h": 11487.7844137, "low_24h": 96890.62, "high_24h": 99517.52, "volume_30d": 291272.94327226, "best_bid": 97819.81, "best_bid_size": 0.00252697, "best_ask": 97819.82, "best_ask_size": 0.00003007}
          - {"sequence_id": 99489630942, "trade_id": 782910561, "price": 97836.53, "last_size": 0.00027044, "trade_time": "2025-02-21 15:46:04", "product_id": "BTC-USD", "side": "buy", "open_24h": 96926, "volume_24h": 11487.7844135, "low_24h": 96890.62, "high_24h": 99517.52, "volume_30d": 291272.94327206, "best_bid": 97819.81, "best_bid_size": 0.00252697, "best_ask": 97836.53, "best_ask_size": 1.06734694}
          - {"sequence_id": 99489630899, "trade_id": 782910560, "price": 97838.19, "last_size": 0.28317495, "trade_time": "2025-02-21 15:46:04", "product_id": "BTC-USD", "side": "buy", "open_24h": 96926, "volume_24h": 11487.78414306, "low_24h": 96890.62, "high_24h": 99517.52, "volume_30d": 291272.94300162, "best_bid": 97810.10, "best_bid_size": 0.00170264, "best_ask": 97838.19, "best_ask_size": 0.01682505}
          - {"sequence_id": 99489630897, "trade_id": 782910559, "price": 97836.92, "last_size": 0.18000000, "trade_time": "2025-02-21 15:46:04", "product_id": "BTC-USD", "side": "buy", "open_24h": 96926, "volume_24h": 11487.50096811, "low_24h": 96890.62, "high_24h": 99517.52, "volume_30d": 291272.65982667, "best_bid": 97810.10, "best_bid_size": 0.00170264, "best_ask": 97838.19, "best_ask_size": 0.30000000}
          - {"sequence_id": 99489630895, "trade_id": 782910558, "price": 97829.29, "last_size": 0.03068486, "trade_time": "2025-02-21 15:46:04", "product_id": "BTC-USD", "side": "buy", "open_24h": 96926, "volume_24h": 11487.32096811, "low_24h": 96890.62, "high_24h": 99517.52, "volume_30d": 291272.47982667, "best_bid": 97810.10, "best_bid_size": 0.00170264, "best_ask": 97836.92, "best_ask_size": 0.18000000}
          - {"sequence_id": 99489630893, "trade_id": 782910557, "price": 97829.28, "last_size": 0.00272981, "trade_time": "2025-02-21 15:46:04", "product_id": "BTC-USD", "side": "buy", "open_24h": 96926, "volume_24h": 11487.29028325, "low_24h": 96890.62, "high_24h": 99517.52, "volume_30d": 291272.44914181, "best_bid": 97810.10, "best_bid_size": 0.00170264, "best_ask": 97829.29, "best_ask_size": 0.03068486}
          - {"sequence_id": 99489630891, "trade_id": 782910556, "price": 97821.92, "last_size": 0.17978000, "trade_time": "2025-02-21 15:46:04", "product_id": "BTC-USD", "side": "buy", "open_24h": 96926, "volume_24h": 11487.28755344, "low_24h": 96890.62, "high_24h": 99517.52, "volume_30d": 291272.44641200, "best_bid": 97810.10, "best_bid_size": 0.00170264, "best_ask": 97829.28, "best_ask_size": 0.00272981}
          - {"sequence_id": 99489630889, "trade_id": 782910555, "price": 97819.89, "last_size": 0.00003027, "trade_time": "2025-02-21 15:46:04", "product_id": "BTC-USD", "side": "buy", "open_24h": 96926, "volume_24h": 11487.10777344, "low_24h": 96890.62, "high_24h": 99517.52, "volume_30d": 291272.26663200, "best_bid": 97810.10, "best_bid_size": 0.00170264, "best_ask": 97821.92, "best_ask_size": 0.17978000}
          - {"sequence_id": 99489630697, "trade_id": 782910554, "price": 97824.75, "last_size": 0.00184414, "trade_time": "2025-02-21 15:46:04", "product_id": "BTC-USD", "side": "buy", "open_24h": 96926, "volume_24h": 11487.10774317, "low_24h": 96890.62, "high_24h": 99517.52, "volume_30d": 291272.26660173, "best_bid": 97819.84, "best_bid_size": 0.02044897, "best_ask": 97824.75, "best_ask_size": 0.00134670}
          - {"sequence_id": 99489630659, "trade_id": 782910553, "price": 97824.76, "last_size": 0.00436809, "trade_time": "2025-02-21 15:46:04", "product_id": "BTC-USD", "side": "buy", "open_24h": 96926, "volume_24h": 11487.10589903, "low_24h": 96890.62, "high_24h": 99517.52, "volume_30d": 291272.26475759, "best_bid": 97810.01, "best_bid_size": 0.00306780, "best_ask": 97824.76, "best_ask_size": 0.17541161}
    expect:
      rows:
        - {"minute": "2025-02-21 15:46:00", total_volume: 0.6828827599999999, total_volume_price: 66808.47772690759, "num_trades": 10}
The core pieces here are the name of the model we want to test, a mock of each input to the model, and the result we expect. In this case, we are aggregating trades per minute so we write a test that expresses a set of trades and the expected result of aggregating them. We can express the rows as any of CSV, JSON, or SQL. I’ve done it in JSON as the cleanest way to express this particular test, but you can mix and match to get the most readable result. One thing to keep in mind though — unit tests should only be run in a development environment.
Intermediate
In the intermediate directory, there are a couple of important differences from what we saw in the staging directory. First off, where in staging we arranged our models by the source of the data, and our intermediate models are now arranged according to business groupings. There isn’t a single approach that works for structuring the intermediate models, so you should use an approach that maps well to your team’s structure.
Another difference in the intermediate models is this is where we start to see changes in the granularity of our data, as well as joins. We are trying to represent common business concepts at this point, rather than providing a clean representation of our raw data. That being said, the models at this point are still not final products.
Marts
Marts are the last stage of our transformation flows. This is where you should put datasets that represent business concepts and are intended to be used directly in analysis. I’ve chosen to name the files to try and make the differences across the directories clear as well. Of course, naming is hard, so you tell me if I succeeded.
In the staging directory, we have stg_coinbase__trades.sql. This indicates that it is a staging model, by which we know that it is mostly raw, that it contains data sourced from Coinbase, and that it contains trades. In the intermediate directory, we have int_trades_per_minute.sql. Again, I indicate that this is an intermediate model and I indicate what transformation I’ve applied, and to what data — aggregating trades on a per-minute basis. Another good name here would be int_trades_aggregated_per_minute.sql. Finally, the model in marts gives us two pieces of information through its path marts/trading/vwap_5_minute.sql . We can see that this model is produced by the ‘trading’ business unit and that the concept represented in this model is the 5-minute volume weighted average price.
Utilities
This is where we put models that are generally useful across many parts of the codebase. The canonical example here is a date dimension. In this case, we found ourselves repeatedly writing a CTE to represent every minute from the first trade until now, so I’ve moved that code into utilities to avoid duplicating it.
Macros
Macros are one of the tools DBT provides to keep your code DRY by allowing you to template common SQL patterns and reuse them. A good example of that is the custom materialization from the last post. You could also use them to extract common patterns you find yourself repeating across many models. Macros must be separated from models. This makes sense because macros should be shared by several models.
Documentation
Another bonus of working with DBT is that having put in the work we did to document our models and correctly reference models from one another we are able to generate a documentation site for our models.
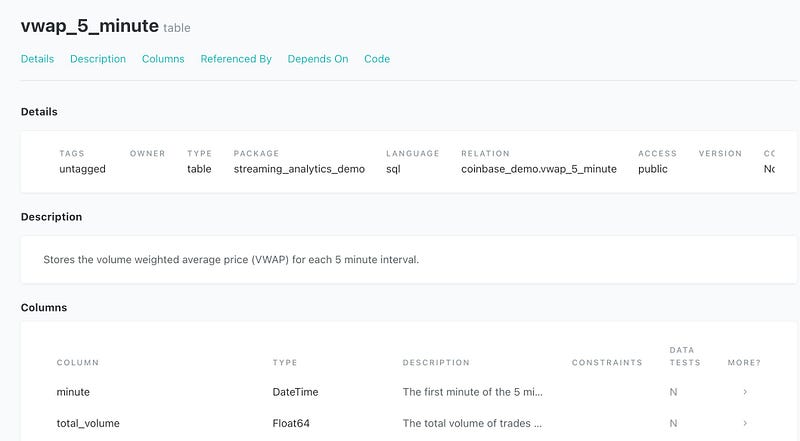
Run dbt docs serve and go to localhost:8000 That will provide the DBT generated documentation page. If you then click through Projects->streaming_analytics_demo->models->marts->trading->vwap_5_minute you’ll get to the documentation above. Looking at the _trading_models.yml will show you where these values come from.
One of the key fields we have not talked about yet is ‘access’. This field describes the intended audience for the model. It does not actually provide access control, just a way to indicate where the model should be used. Public access, as you see on this model indicates that this model is supported and available for general use. Protected (the default) indicates that a model should only be used within this project. Private indicates that the model exists for a single purpose and should not be used beyond that.
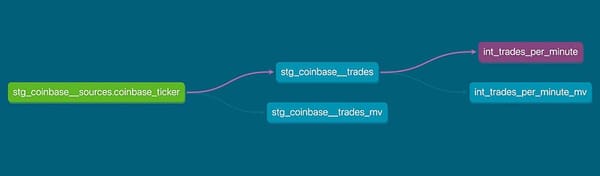
Another valuable item from the DBT docs is the lineage graph. You can get to it by clicking the circle on the lower right of your screen:
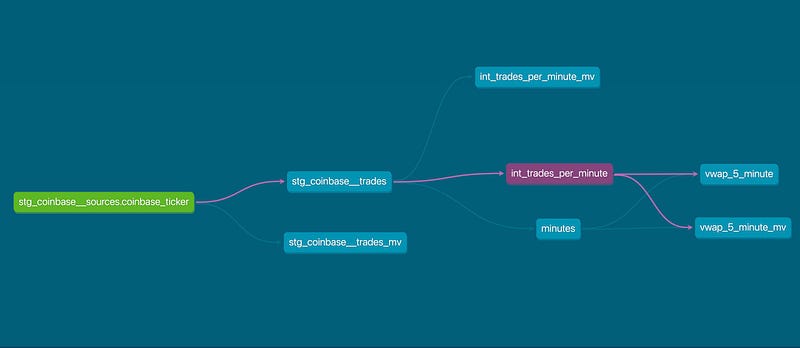
This view allows us to trace the dependencies of any model in DBT. I’ve filtered this one down a bit using the ‘resources’ on the lower left of the view. By using this, we can quickly see where a model is used and understand what is impacted if we have a problem in one of our upstream models.
What’s Next?
DBT provides great tools for applying good practices from software engineering to apply and maintain our transformations. We get facilities for reducing copy-paste, testing, documentation, and creating a standard style. It even gives us some key pieces that we’ll need to implement a governance program, but it isn’t quite enough.
Much like our prior step where we created a simple platform, it is a good step that delivers tangible value quickly. This will now work well for our engineering team, but it will still be uncomfortable for analysts and business users pretty quickly. It will remain difficult to find the correct table for an analysis project as the number of models grows. There is no good way to understand the lineage of a column in our tables, and if there is a problem we have a hint of where to go — but only if we understand the project structure and how it ties to team structure. Again, this can get us by for a while, but we’ll need to add in more tooling to go from a maintainable platform to one that scales with our business.
Like this article? Clap 👏 or share it on LinkedIn and tag me! It really helps me out. Thank You!